[advanced]
All > World History and History of Europe, Asia, Africa, Australia, New Zealand, etc. > Romanies > 2010-15 Toyota Prius Windshield Wiper Cowl Removal
2010-15 Toyota Prius Windshield Wiper Cowl Removal


    Prius Windshield Wiper Cowl
    Prius Windshield Wiper Cowl

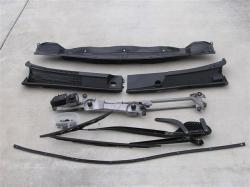
    With the Prius’ engine tucked further in closer to the firewall and having the windshield wiper cowl overhanging the area where the ignition coils reside, the cowl must be removed for access clearance. While the steps appear to be complicated, it really isn’t and it should take you no more than an hour to remove and re-install the windshield wiper cowls. Removing the cowl also allow you the opportunity to clean up any debris deposit, such as dried up leaves and berries, especially if you park your car under trees often.


    Step 1:

    Let’s remove the wiper arms to start. Begin with the driver side wiper. Remove the the cap at the base of the wiper arm simply by pulling it out with your thumb and index finger. Unbolt the 14 mm nut from the driver side wiper and two 14 mm nuts from the passenger side wiper. Set nuts aside and lift wipers out.


    Step 2:

    Remove the windshield wiper driver side and passenger side end-caps by inserting a Flathead screw driver between the crease and turning clockwise. The end-cap should lift up. Remove and set aside.


    Step 3:

    Remove two push-pin retainer clips from the windshield wiper cowl, one on the driver side and one at the passenger side. Simple push the the circle on each pin until the pin is released. Remove the push-pin retainer clips and set aside.


    Step 4:

    Disengage the five clips on the windshield wiper cowl from the windshield motor sub-assembly  along the passenger half side of the vehicle. You can do this by simply pinching the clips with a needle nose pliers or pushing them with a Flathead screwdriver until they disengage.

    • Carefully lift the cowl out and set aside.
    • I took this opportunity to clean out years of debris trapped on the mesh vent along the passenger side.
    • Then I gave it a nice hose down with water. (optional)


    Step 5:

    Disconnect the windshield wiper motor cable by pinching the clip down and pulling out. A pair of needle nose pliers may make this easier.

    Disengage the windshield wiper motor cable from the wiper motor assembly at the locations marked in yellow. The clip marked in the red circle is removed once the wiper motor assembly is removed.


    Step 6:

    Remove four 10 mm bolts from the wiper motor assembly and then lift the wiper motor assembly off from the wiper motor sub-assembly.

    To do this, you’ll need to slide the wiper motor assembly slightly to your left (there is a mounting point at the back), pull the wiper motor assembly towards you and lift out.

    Remove the last clip from underneath the wiper motor assembly using a needle nose pliers, then set windshield wiper motor and link assembly aside.


    Step 7:
    • Remove three (3) 10 mm bolts from the cowl body mounting reinforcement bracket and remove bracket.
    • Remove nine (9) 10 mm bolts from the outer cowl top panel sub-assembly on the marked locations and set aside. Clear the plastic cable channels from the chassis then carefully lift the sub-assembly out.
    • You may need to lift it out at an angle for clearance. From here, you should have full access to the Prius’ ignition coils.
        of    

    1 1   6 views • Dec 5, 2021

    Dĩ Vãng


    <h2>Tools and Materials Needed</h2>
    

    <p><a href="https://amzn.to/2Wq0ggL" rel="noopener noreferrer" target="_blank">9/16 magnetic spark plug socket</a></p>

    <p>14 mm socket</p>

    <p>10 mm socket</p>

    <p>Flathead screwdriver</p>

    <p>Ratchet</p>

    <p>Needle nose pliers</p>

    <p><a href="https://amzn.to/2WrOvGq" rel="noopener noreferrer" target="_blank">Anti-seize grease</a> (optional)</p>

    <p><a href="https://amzn.to/2WlswRD" rel="noopener noreferrer" target="_blank">4x NGK (4912) ILKAR7B11 (4912) Laser Iridium Spark Plugs</a>. These are pre-gapped.</p>